Pokyny pro nastavení proxy serverů v prohlížečích/softwaru/rozšířeních
INSTRUCTION. HOW TO SET UP AN IPV6 PROXY ON WINDOWS IN 30 SECONDS
18.01.2019

- The possibility of acquiring a dynamic address, even if the statistical IP is used.
- High connection speed and significant savings in traffic due to caching.
- Acceptable cost, which is due to the large number of free IP addresses.
- A high level of privacy.
- Guarantee of bypassing blocks for all web portals.
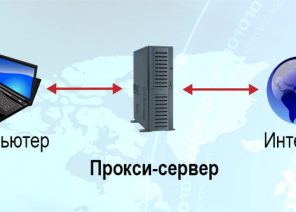
Configure proxy ipv6 on Windows
First, check if your connection type supports such proxy protocol – this is especially important if you use the paid version. Go to the Network and Sharing Center, click the Connection tab and then look for the Protocol Connection version 6 option under Properties. The process to configure the proxy server on Windows looks like this: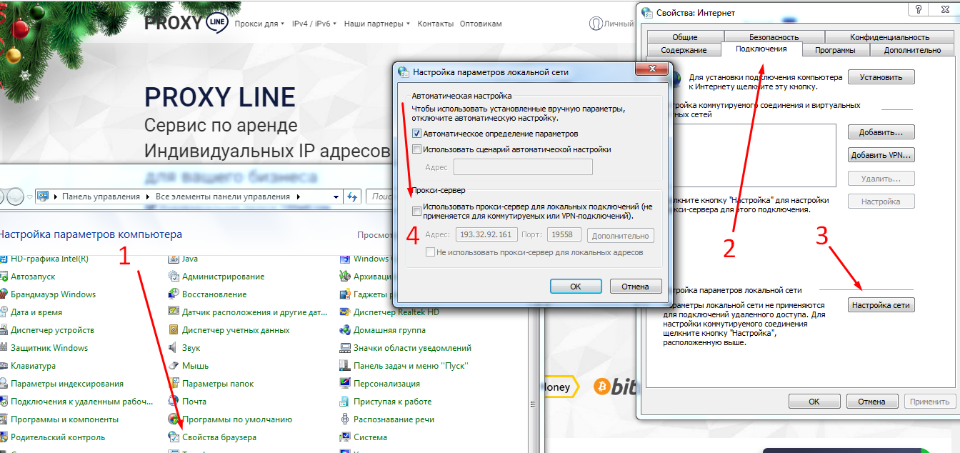 First, check if your connection type supports such proxy protocol – this is especially important if you use the paid version. Go to the Network and Sharing Center, click the Connection tab and then look for the Protocol Connection version 6 option under Properties. The process to configure the proxy server on Windows looks like this:
Open the „Control Panel“ and go to the „Browser Options“ section.
This will open the „Internet Properties“ window. You can get to this section in another way: Simultaneously press the key labeled Windows and the „R“ key. In the displayed field type inetcpl.cpl.
Move to the „Connections“ tab and click „Network Settings“. Sometimes it is also called „LAN setup“.
We allow the use of proxy for local connections by checking the corresponding option.
In the necessary fields we prescribe the IP address and the working port of the server used. If necessary, you can specify certain proxy settings or select the „One proxy server for all protocols“ feature by checking the corresponding line in the „Advanced“ section.
Save the changes made by clicking „OK“.
This instruction is suitable for enabling a single proxy server on Windows of any version. Please note: If you have a list of websites that do not require a personal IP, enter the addresses with a semicolon in the line „Do not use a proxy server for … Use“. If necessary, you can change the proxy server settings in the same way – for example, if you decide to use a different IP address, or the list of addresses for which you do not need to use a proxy has been populated. Do not forget to confirm all manipulations by clicking „OK“.
First, check if your connection type supports such proxy protocol – this is especially important if you use the paid version. Go to the Network and Sharing Center, click the Connection tab and then look for the Protocol Connection version 6 option under Properties. The process to configure the proxy server on Windows looks like this:
Open the „Control Panel“ and go to the „Browser Options“ section.
This will open the „Internet Properties“ window. You can get to this section in another way: Simultaneously press the key labeled Windows and the „R“ key. In the displayed field type inetcpl.cpl.
Move to the „Connections“ tab and click „Network Settings“. Sometimes it is also called „LAN setup“.
We allow the use of proxy for local connections by checking the corresponding option.
In the necessary fields we prescribe the IP address and the working port of the server used. If necessary, you can specify certain proxy settings or select the „One proxy server for all protocols“ feature by checking the corresponding line in the „Advanced“ section.
Save the changes made by clicking „OK“.
This instruction is suitable for enabling a single proxy server on Windows of any version. Please note: If you have a list of websites that do not require a personal IP, enter the addresses with a semicolon in the line „Do not use a proxy server for … Use“. If necessary, you can change the proxy server settings in the same way – for example, if you decide to use a different IP address, or the list of addresses for which you do not need to use a proxy has been populated. Do not forget to confirm all manipulations by clicking „OK“.
Disabling ipv6 proxy on Windows
To stop the operating system using a private proxy, log in to the Internet Properties section again using the instructions above and selecting the Connections tab. Then look for the section that talks about dial-up and vpn networks. Specify the type of connection you want to use later and open the network settings. Disable the use of proxy for this connection by unchecking the corresponding option and clicking OK. This way you will return to work or surf the Internet normally. Disabling proxy is not a personal whim of the user, but a necessity that occurs when the selected server is not satisfied with the quality. To avoid problems when working with proxy, we recommend you to buy proven paid IP, which is characterized by functionality, reliability and consistently high download speeds.
Možná vás to bude zajímat


affiliate program
Partnerský program vám umožňuje získat 10 % ze všech celoživotních plateb od zákazníků, na které jste se obrátili prostřednictvím svého partnerského odkazu.
Abyste se mohli programu zúčastnit, potřebujete
Přilákejte k nám nové zákazníky pomocí doporučujícího odkazu – uživatel, který se zaregistruje pomocí vašeho odkazu, je vám přidělen na celý život a vy dostanete 10 % ze všech jeho plateb.
Odměnu affiliate partnera lze zobrazit na ![]() WebMoney,
WebMoney, ![]() Yumani,
Yumani,
![]() Tether USDT (TRC20),
Tether USDT (TRC20), ![]() Bankovní kartu nebo ji použijte k platbě za jakékoli služby naší služby.
Bankovní kartu nebo ji použijte k platbě za jakékoli služby naší služby.

Máte nějaké dotazy nebo jste velkoobchodník?
Napište nám na adresu ![]() Telegram a my se vám pokusíme co nejdříve pomoci a poradit.
Telegram a my se vám pokusíme co nejdříve pomoci a poradit.
Na našem kanálu Telegram můžete vždy získat slevy a informace o aktualizacích služeb.
Nezapomeňte se přihlásit k odběru kanálu, abyste měli přehled o všech novinkách.


Спасибо!
Ваша заявка принята!
В ближайшее время
мы свяжемся с Вами
Ваша заявка принята!
В ближайшее время
мы свяжемся с Вами
